---
layout: global
title: Useful Developer Tools
type: "page"
navigation:
weight: 5
show: true
---
Test coverage
Apache Spark community uses various resources to maintain the community test coverage.
GitHub Actions
[GitHub Actions](https://github.com/apache/spark/actions) provides the following on Ubuntu 22.04.
Apache Spark 4
- Scala 2.13 SBT build with Java 17
- Scala 2.13 Maven build with Java 17/21
- Java/Scala/Python/R unit tests with Java 17/Scala 2.13/SBT
- TPC-DS benchmark with scale factor 1
- JDBC Docker integration tests
- Kubernetes integration tests
- Daily Java/Scala/Python/R unit tests with Java 21 and Scala 2.13/SBT
Apache Spark 3
- Scala 2.12 SBT build with Java 8
- Scala 2.12 Maven build with Java 11/17
- Java/Scala/Python/R unit tests with Java 8/Scala 2.12/SBT
- Kubernetes integration tests
- Daily Java/Scala/Python/R unit tests with Java 8 and Scala 2.13/SBT
- Daily JDBC Docker integration tests with Java 8 and Scala 2.13/SBT
- Daily TPC-DS benchmark with scale factor 1 with Java 8 and Scala 2.12/SBT
Useful developer tools
Reducing build times
SBT: Avoiding re-creating the assembly JAR
Spark's default build strategy is to assemble a jar including all of its dependencies. This can
be cumbersome when doing iterative development. When developing locally, it is possible to create
an assembly jar including all of Spark's dependencies and then re-package only Spark itself
when making changes.
```
$ build/sbt clean package
$ ./bin/spark-shell
$ export SPARK_PREPEND_CLASSES=true
$ ./bin/spark-shell # Now it's using compiled classes
# ... do some local development ... #
$ build/sbt compile
$ unset SPARK_PREPEND_CLASSES
$ ./bin/spark-shell
# You can also use ~ to let sbt do incremental builds on file changes without running a new sbt session every time
$ build/sbt ~compile
```
Building submodules individually
For instance, you can build the Spark Core module using:
```
$ # sbt
$ build/sbt
> project core
> package
$ # or you can build the spark-core module with sbt directly using:
$ build/sbt core/package
$ # Maven
$ build/mvn package -DskipTests -pl core
```
Running Individual Tests
When developing locally, it's often convenient to run a single test or a few tests, rather than running the entire test suite.
Testing with SBT
The fastest way to run individual tests is to use the `sbt` console. It's fastest to keep a `sbt` console open, and use it to re-run tests as necessary. For example, to run all of the tests in a particular project, e.g., `core`:
```
$ build/sbt
> project core
> test
```
You can run a single test suite using the `testOnly` command. For example, to run the DAGSchedulerSuite:
```
> testOnly org.apache.spark.scheduler.DAGSchedulerSuite
```
The `testOnly` command accepts wildcards; e.g., you can also run the `DAGSchedulerSuite` with:
```
> testOnly *DAGSchedulerSuite
```
Or you could run all of the tests in the scheduler package:
```
> testOnly org.apache.spark.scheduler.*
```
If you'd like to run just a single test in the `DAGSchedulerSuite`, e.g., a test that includes "SPARK-12345" in the name, you run the following command in the sbt console:
```
> testOnly *DAGSchedulerSuite -- -z "SPARK-12345"
```
If you'd prefer, you can run all of these commands on the command line (but this will be slower than running tests using an open console). To do this, you need to surround `testOnly` and the following arguments in quotes:
```
$ build/sbt "core/testOnly *DAGSchedulerSuite -- -z SPARK-12345"
```
For more about how to run individual tests with sbt, see the [sbt documentation](https://www.scala-sbt.org/1.x/docs/Testing.html).
Testing with Maven
With Maven, you can use the `-DwildcardSuites` flag to run individual Scala tests:
```
build/mvn -Dtest=none -DwildcardSuites=org.apache.spark.scheduler.DAGSchedulerSuite test
```
You need `-Dtest=none` to avoid running the Java tests. For more information about the ScalaTest Maven Plugin, refer to the [ScalaTest documentation](http://www.scalatest.org/user_guide/using_the_scalatest_maven_plugin).
To run individual Java tests, you can use the `-Dtest` flag:
```
build/mvn test -DwildcardSuites=none -Dtest=org.apache.spark.streaming.JavaAPISuite test
```
Testing PySpark
To run individual PySpark tests, you can use `run-tests` script under `python` directory. Test cases are located at `tests` package under each PySpark packages.
Note that, if you add some changes into Scala or Python side in Apache Spark, you need to manually build Apache Spark again before running PySpark tests in order to apply the changes.
Running PySpark testing script does not automatically build it.
Also, note that there is an ongoing issue to use PySpark on macOS High Serria+. `OBJC_DISABLE_INITIALIZE_FORK_SAFETY`
should be set to `YES` in order to run some of tests.
See [PySpark issue](https://issues.apache.org/jira/browse/SPARK-25473) and [Python issue](https://bugs.python.org/issue33725) for more details.
To run test cases in a specific module:
```
$ python/run-tests --testnames pyspark.sql.tests.test_arrow
```
To run test cases in a specific class:
```
$ python/run-tests --testnames 'pyspark.sql.tests.test_arrow ArrowTests'
```
To run single test case in a specific class:
```
$ python/run-tests --testnames 'pyspark.sql.tests.test_arrow ArrowTests.test_null_conversion'
```
You can also run doctests in a specific module:
```
$ python/run-tests --testnames pyspark.sql.dataframe
```
Lastly, there is another script called `run-tests-with-coverage` in the same location, which generates coverage report for PySpark tests. It accepts same arguments with `run-tests`.
```
$ python/run-tests-with-coverage --testnames pyspark.sql.tests.test_arrow --python-executables=python
...
Name Stmts Miss Branch BrPart Cover
-------------------------------------------------------------------
pyspark/__init__.py 42 4 8 2 84%
pyspark/_globals.py 16 3 4 2 75%
...
Generating HTML files for PySpark coverage under /.../spark/python/test_coverage/htmlcov
```
You can check the coverage report visually by HTMLs under `/.../spark/python/test_coverage/htmlcov`.
Please check other available options via `python/run-tests[-with-coverage] --help`.
Testing K8S
Although GitHub Actions provide both K8s unit test and integration test coverage, you can run it locally. For example, Volcano batch scheduler integration test should be done manually. Please refer the integration test documentation for the detail.
[https://github.com/apache/spark/blob/master/resource-managers/kubernetes/integration-tests/README.md](https://github.com/apache/spark/blob/master/resource-managers/kubernetes/integration-tests/README.md)
Running the Docker integration tests
Docker integration tests are covered by GitHub Actions. However, you can run it locally to speedup deveplopment and testing.
Please refer the [Docker integration test documentation](https://github.com/apache/spark/blob/master/connector/docker-integration-tests/README.md) for the detail.
Testing with GitHub Actions workflow
Apache Spark leverages GitHub Actions that enables continuous integration and a wide range of automation. Apache Spark repository provides several GitHub Actions workflows for developers to run before creating a pull request.
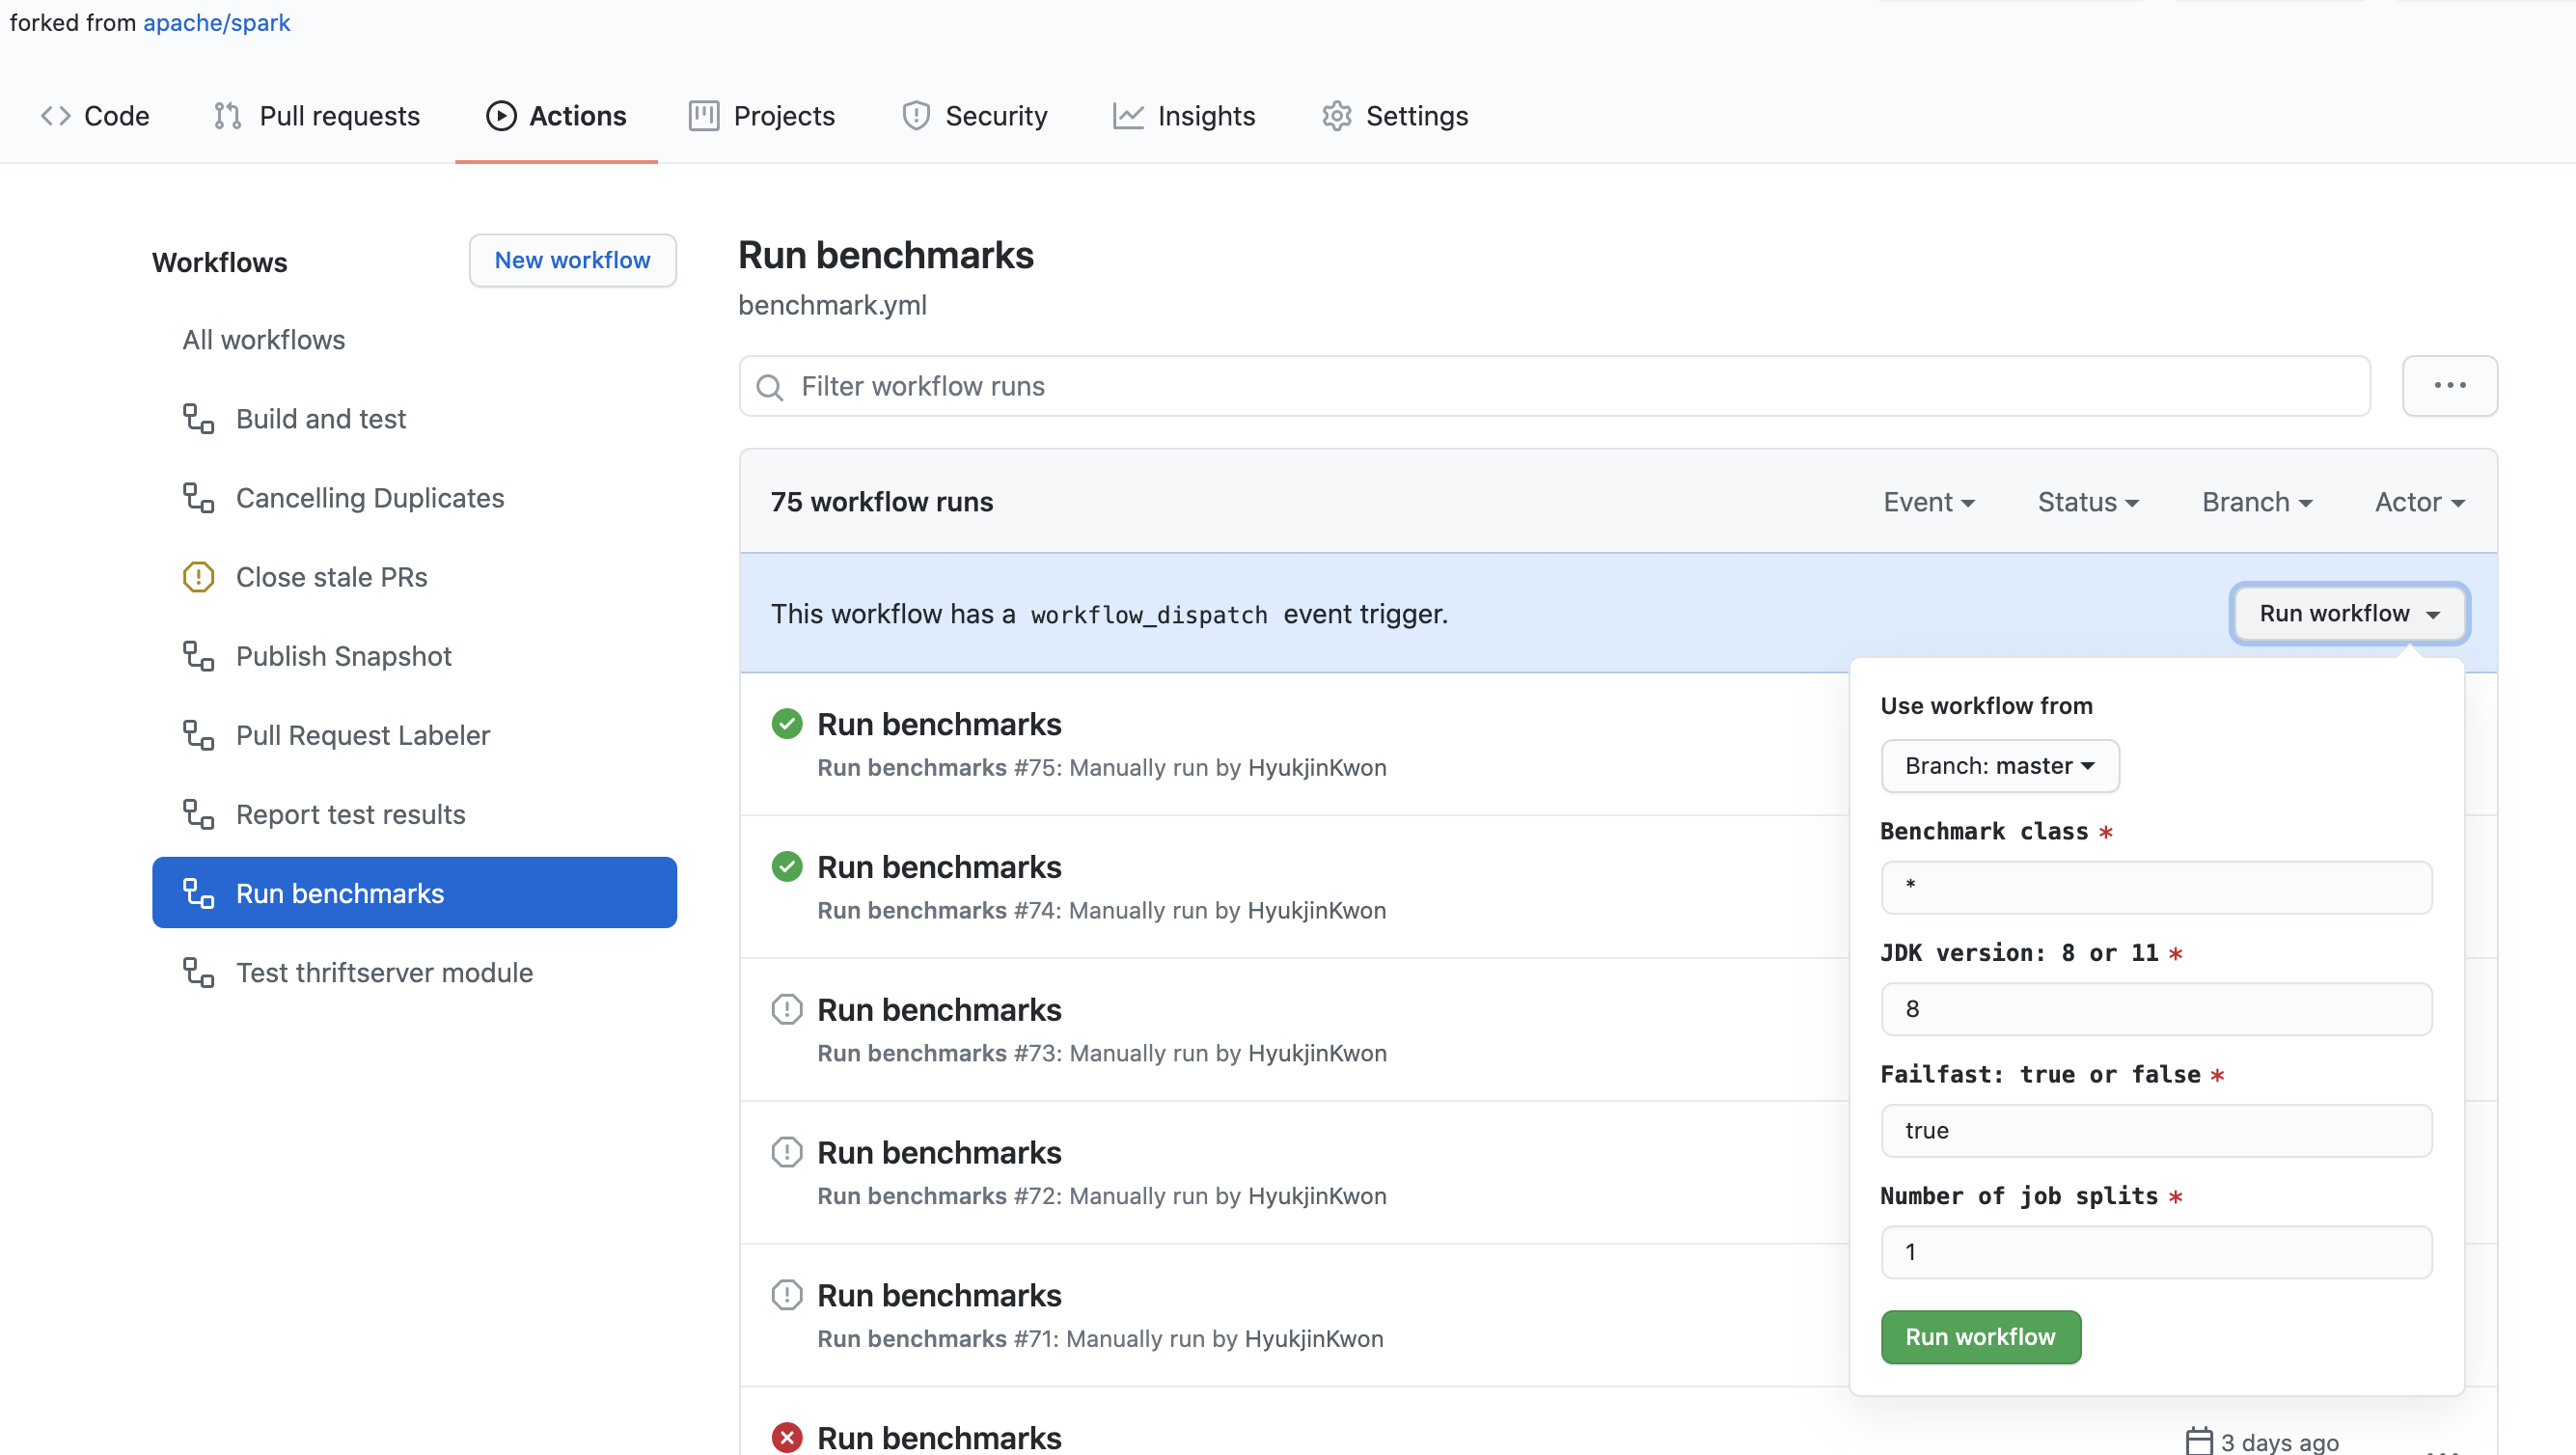
Running benchmarks in your forked repository
Apache Spark repository provides an easy way to run benchmarks in GitHub Actions. When you update the benchmark results in a pull request, it is recommended to use GitHub Actions to run and generate the benchmark results in order to run them on the environment as same as possible.
- Click the "Actions" tab in your forked repository.
- Select the "Run benchmarks" workflow in the "All workflows" list.
- Click the "Run workflow" button and enter the fields appropriately as below:
- **Benchmark class**: the benchmark class which you wish to run. It allows a glob pattern. For example, `org.apache.spark.sql.*`.
- **JDK version**: Java version you want to run the benchmark with. For example, `11`.
- **Failfast**: indicates if you want to stop the benchmark and workflow when it fails. When `true`, it fails right away. When `false`, it runs all whether it fails or not.
- **Number of job splits**: it splits the benchmark jobs into the specified number, and runs them in parallel. It is particularly useful to work around the time limits of workflow and jobs in GitHub Actions.
- Once a "Run benchmarks" workflow is finished, click the workflow and download benchmarks results at "Artifacts".
- Go to your root directory of Apache Spark repository, and unzip/untar the downloaded files which will update the benchmark results with appropriately locating the files to update.
ScalaTest issues
If the following error occurs when running ScalaTest
```
An internal error occurred during: "Launching XYZSuite.scala".
java.lang.NullPointerException
```
It is due to an incorrect Scala library in the classpath. To fix it:
- Right click on project
- Select `Build Path | Configure Build Path`
- `Add Library | Scala Library`
- Remove `scala-library-2.10.4.jar - lib_managed\jars`
In the event of "Could not find resource path for Web UI: org/apache/spark/ui/static",
it's due to a classpath issue (some classes were probably not compiled). To fix this, it
sufficient to run a test from the command line:
```
build/sbt "testOnly org.apache.spark.rdd.SortingSuite"
```
Binary compatibility
To ensure binary compatibility, Spark uses [MiMa](https://github.com/lightbend/mima).
Ensuring binary compatibility
When working on an issue, it's always a good idea to check that your changes do
not introduce binary incompatibilities before opening a pull request.
You can do so by running the following command:
```
$ dev/mima
```
A binary incompatibility reported by MiMa might look like the following:
```
[error] method this(org.apache.spark.sql.Dataset)Unit in class org.apache.spark.SomeClass does not have a correspondent in current version
[error] filter with: ProblemFilters.exclude[DirectMissingMethodProblem]("org.apache.spark.SomeClass.this")
```
Solving a binary incompatibility
If you believe that your binary incompatibilies are justified or that MiMa
reported false positives (e.g. the reported binary incompatibilities are about a
non-user facing API), you can filter them out by adding an exclusion in
[project/MimaExcludes.scala](https://github.com/apache/spark/blob/master/project/MimaExcludes.scala)
containing what was suggested by the MiMa report and a comment containing the
JIRA number of the issue you're working on as well as its title.
For the problem described above, we might add the following:
{% highlight scala %}
// [SPARK-zz][CORE] Fix an issue
ProblemFilters.exclude[DirectMissingMethodProblem]("org.apache.spark.SomeClass.this")
{% endhighlight %}
Otherwise, you will have to resolve those incompatibilies before opening or
updating your pull request. Usually, the problems reported by MiMa are
self-explanatory and revolve around missing members (methods or fields) that
you will have to add back in order to maintain binary compatibility.
Checking out pull requests
Git provides a mechanism for fetching remote pull requests into your own local repository.
This is useful when reviewing code or testing patches locally. If you haven't yet cloned the
Spark Git repository, use the following command:
```
$ git clone https://github.com/apache/spark.git
$ cd spark
```
To enable this feature you'll need to configure the git remote repository to fetch pull request
data. Do this by modifying the `.git/config` file inside of your Spark directory. The remote may
not be named "origin" if you've named it something else:
```
[remote "origin"]
url = git@github.com:apache/spark.git
fetch = +refs/heads/*:refs/remotes/origin/*
fetch = +refs/pull/*/head:refs/remotes/origin/pr/* # Add this line
```
Once you've done this you can fetch remote pull requests
```
# Fetch remote pull requests
$ git fetch origin
# Checkout a remote pull request
$ git checkout origin/pr/112
# Create a local branch from a remote pull request
$ git checkout origin/pr/112 -b new-branch
```
Generating dependency graphs
```
$ # sbt
$ build/sbt dependencyTree
$ # Maven
$ build/mvn -DskipTests install
$ build/mvn dependency:tree
```
Organizing imports
You can use a IntelliJ Imports Organizer
from Aaron Davidson to help you organize the imports in
your code. It can be configured to match the import ordering from the style guide.
Formatting code
To format Scala code, run the following command prior to submitting a PR:
```
$ ./dev/scalafmt
```
By default, this script will format files that differ from git master. For more information, see scalafmt documentation, but use the existing script not a locally installed version of scalafmt.
IDE setup
Make sure you have a clean start before setting up the IDE: A clean git clone of the Spark repo, install the latest
version of the IDE.
If something goes wrong, clear the build outputs by `./build/sbt clean` and `./build/mvn clean`, clear the m2
cache by `rm -rf ~/.m2/repository/*`, re-import the project into the IDE cleanly and try again.
IntelliJ
While many of the Spark developers use SBT or Maven on the command line, the most common IDE we
use is IntelliJ IDEA. You need to install the JetBrains Scala plugin from `Preferences > Plugins`.
Due to the complexity of Spark build, please modify the following global settings of IntelliJ IDEA:
- Go to `Settings -> Build, Execution, Deployment -> Build Tools -> Maven -> Importing`, make sure you
choose "Detect automatically" for `Generated source folders`, and choose "generate sources" for
`Phase to be used for folders update`.
- Go to `Settings -> Build, Execution, Deployment -> Compiler -> Scala Compiler -> Scala Compiler Server`,
pick a large enough number for `Maximum heap size, MB`, such as "4000".
To create a Spark project for IntelliJ:
- Download IntelliJ and install the
Scala plug-in for IntelliJ.
- Go to `File -> Import Project`, locate the spark source directory, and select "Maven Project". It's important to
pick Maven instead of sbt here, as Spark has complicated building logic that is implemented for sbt using Scala code
in `SparkBuilder.scala`, and IntelliJ IDEA cannot understant it well.
- In the Import wizard, it's fine to leave settings at their default. However it is usually useful
to enable "Import Maven projects automatically", since changes to the project structure will
automatically update the IntelliJ project.
- As documented in Building Spark,
some build configurations require specific profiles to be
enabled. The same profiles that are enabled with `-P[profile name]` above may be enabled on the
Profiles screen in the Import wizard. For example, if developing for Hadoop 2.7 with YARN support,
enable profiles `yarn` and `hadoop-2.7`. These selections can be changed later by accessing the
"Maven Projects" tool window from the View menu, and expanding the Profiles section.
Other tips:
- "Rebuild Project" can fail the first time the project is compiled, because generate source files
are not automatically generated. Try clicking the "Generate Sources and Update Folders For All
Projects" button in the "Maven Projects" tool window to manually generate these sources.
- The version of Maven bundled with IntelliJ may not be new enough for Spark. If that happens,
the action "Generate Sources and Update Folders For All Projects" could fail silently.
Please remember to reset the Maven home directory
(`Preference -> Build, Execution, Deployment -> Maven -> Maven home directory`) of your project to
point to a newer installation of Maven. You may also build Spark with the script `build/mvn` first.
If the script cannot locate a new enough Maven installation, it will download and install a recent
version of Maven to folder `build/apache-maven-/`.
- Some of the modules have pluggable source directories based on Maven profiles (i.e. to support
both Scala 2.11 and 2.10 or to allow cross building against different versions of Hive). In some
cases IntelliJ's does not correctly detect use of the maven-build-plugin to add source directories.
In these cases, you may need to add source locations explicitly to compile the entire project. If
so, open the "Project Settings" and select "Modules". Based on your selected Maven profiles, you
may need to add source folders to the following modules:
- spark-hive: add v0.13.1/src/main/scala
- spark-streaming-flume-sink: add target\scala-2.11\src_managed\main\compiled_avro
- spark-catalyst: add target\scala-2.11\src_managed\main
- Compilation may fail with an error like "scalac: bad option:
-P:/home/jakub/.m2/repository/org/scalamacros/paradise_2.10.4/2.0.1/paradise_2.10.4-2.0.1.jar".
If so, go to Preferences > Build, Execution, Deployment > Scala Compiler and clear the "Additional
compiler options" field. It will work then although the option will come back when the project
reimports. If you try to build any of the projects using quasiquotes (eg., sql) then you will
need to make that jar a compiler plugin (just below "Additional compiler options").
Otherwise you will see errors like:
```
/Users/irashid/github/spark/sql/catalyst/src/main/scala/org/apache/spark/sql/catalyst/expressions/codegen/CodeGenerator.scala
Error:(147, 9) value q is not a member of StringContext
Note: implicit class Evaluate2 is not applicable here because it comes after the application point and it lacks an explicit result type
q"""
^
```
Debug Spark remotely
This part will show you how to debug Spark remotely with IntelliJ.
Set up remote debug configuration
Follow Run > Edit Configurations > + > Remote to open a default Remote Configuration template:
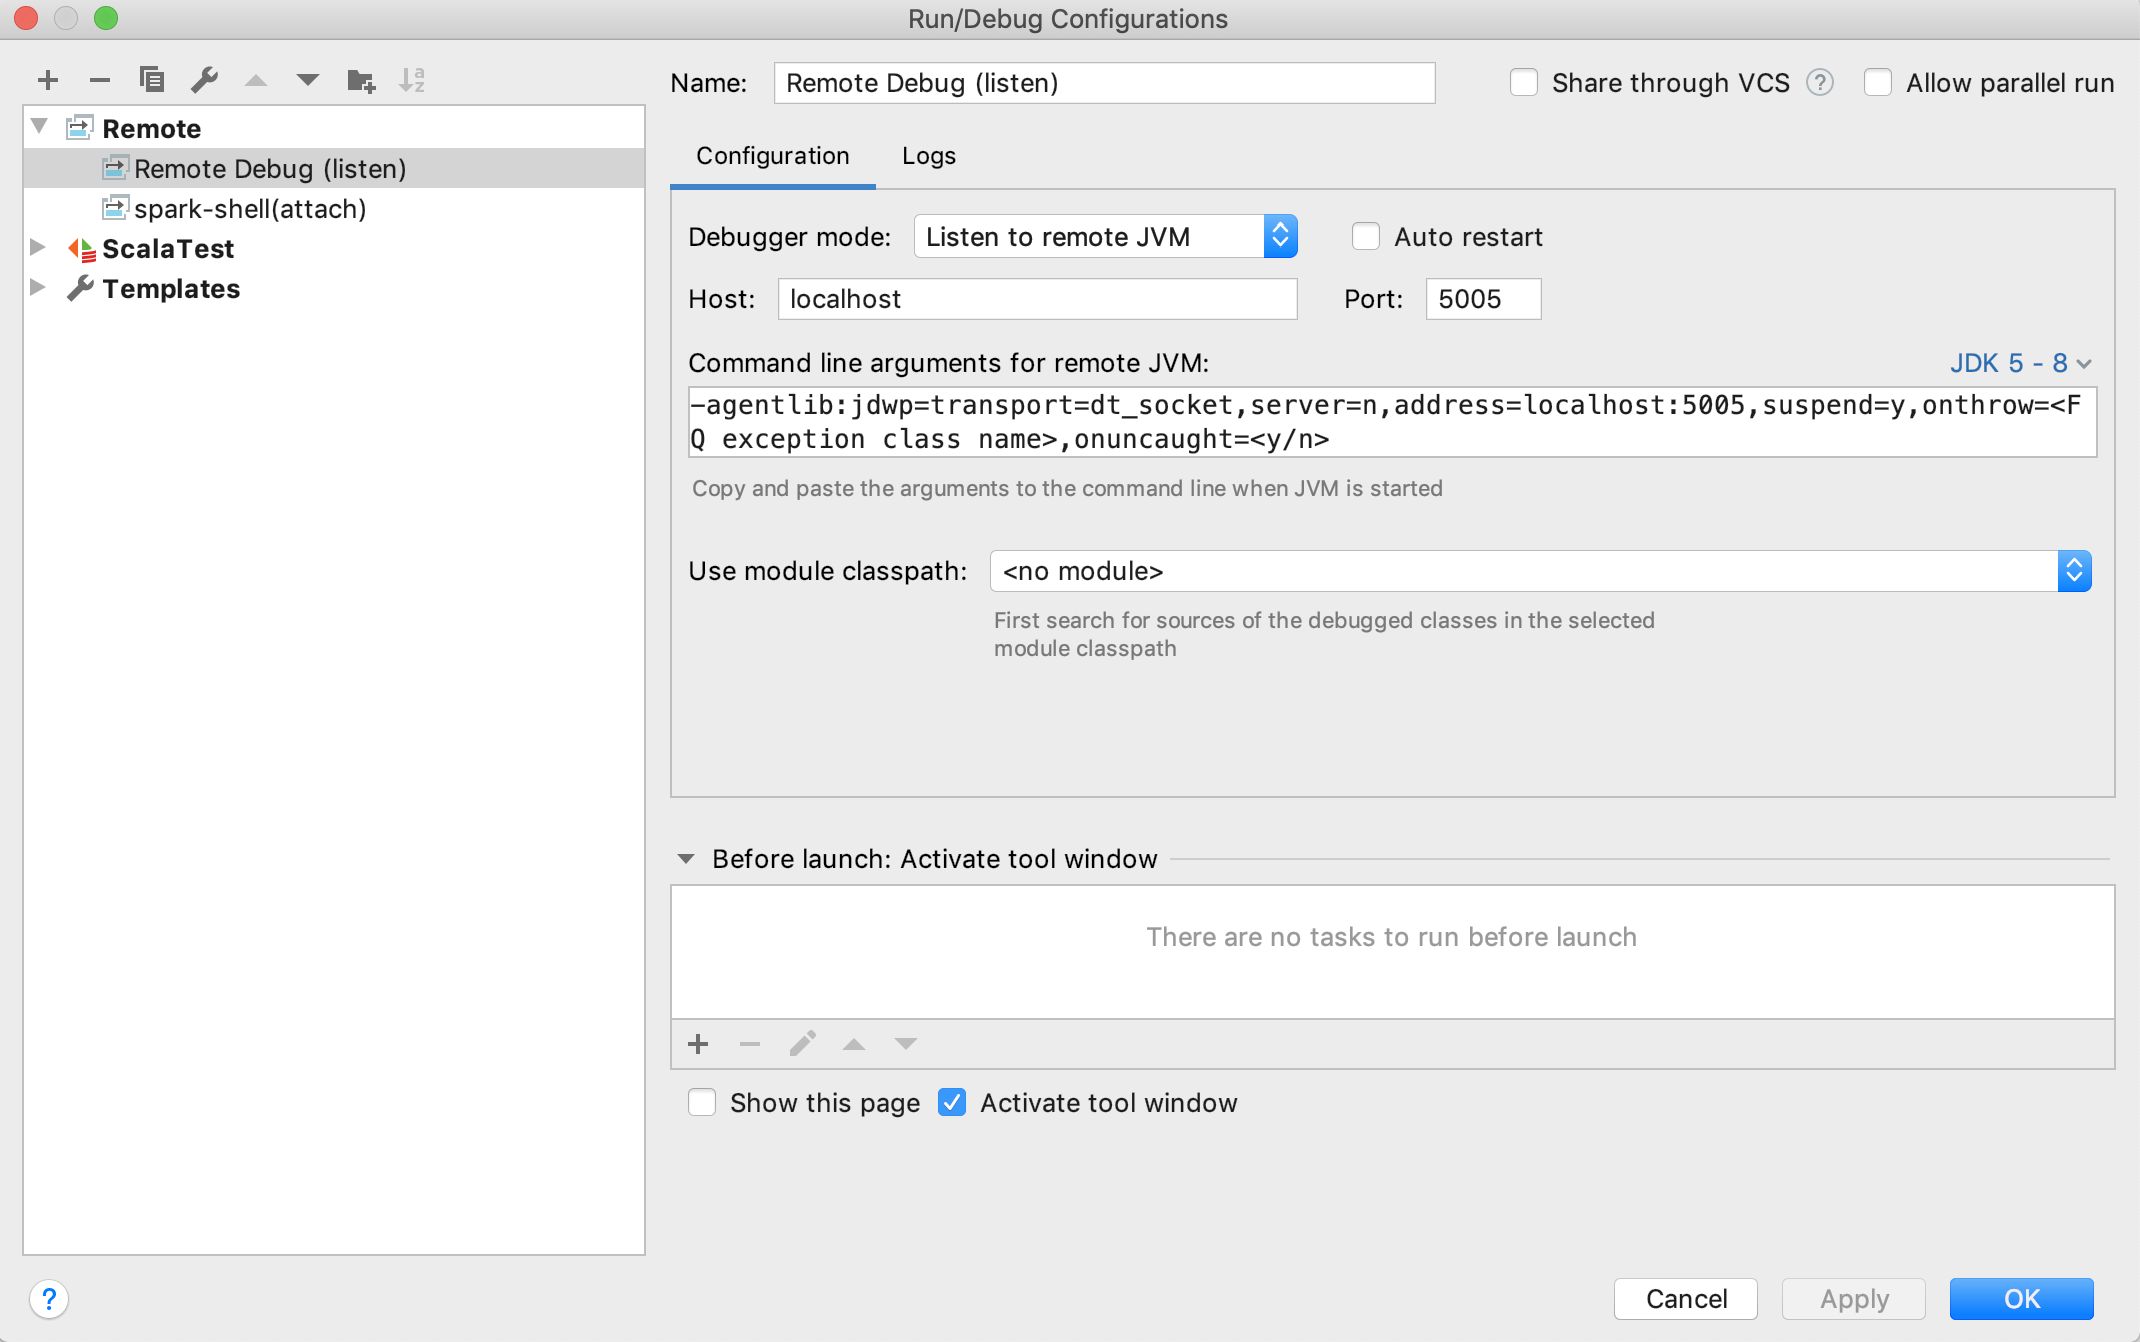 Normally, the default values should be good enough to use. Make sure that you choose Listen to remote JVM
as Debugger mode and select the right JDK version to generate proper Command line arguments for remote JVM.
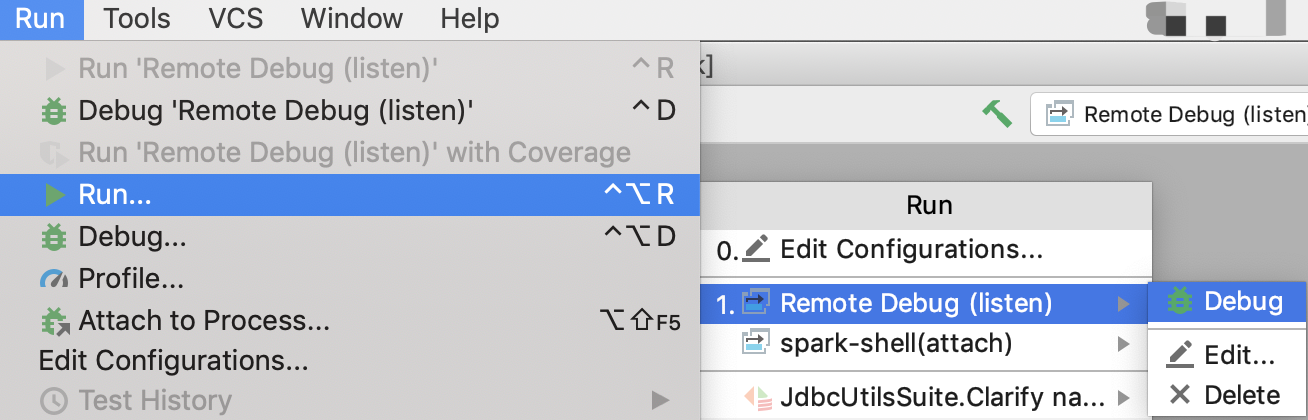
Once you finish configuration and save it. You can follow Run > Run > Your_Remote_Debug_Name > Debug to start remote debug
process and wait for SBT console to connect:
Normally, the default values should be good enough to use. Make sure that you choose Listen to remote JVM
as Debugger mode and select the right JDK version to generate proper Command line arguments for remote JVM.
Once you finish configuration and save it. You can follow Run > Run > Your_Remote_Debug_Name > Debug to start remote debug
process and wait for SBT console to connect:
Trigger the remote debugging
In general, there are 2 steps:
1. Set JVM options using the Command line arguments for remote JVM generated in the last step.
2. Start the Spark execution (SBT test, pyspark test, spark-shell, etc.)
The following is an example of how to trigger the remote debugging using SBT unit tests.
Enter in SBT console
```
./build/sbt
```
Switch to project where the target test locates, e.g.:
```
sbt > project core
```
Copy pasting the Command line arguments for remote JVM
```
sbt > set javaOptions in Test += "-agentlib:jdwp=transport=dt_socket,server=n,suspend=n,address=localhost:5005"
```
Set breakpoints with IntelliJ and run the test with SBT, e.g.:
```
sbt > testOnly *SparkContextSuite -- -t "Only one SparkContext may be active at a time"
```
It should be successfully connected to IntelliJ when you see "Connected to the target VM,
address: 'localhost:5005', transport: 'socket'" in IntelliJ console. And then, you can start
debug in IntelliJ as usual.
To exit remote debug mode (so that you don't have to keep starting the remote debugger),
type "session clear" in SBT console while you're in a project.
Cursor/VS Code
You can leverage the power of *Cursor* or *VS Code* for Spark development by using the Metals extension.
Metals provides robust Scala support through the Build Server Protocol (BSP).
Initial setup:
- *Install Metals*: Search for and install the Scala (Metals) extension from the Marketplace.
- *Open Project*: Open your Spark root directory.
- *Select Build Tool*: When prompted by the popup in the bottom-left corner, select sbt to read build definition.
- *Confirm Build Server*: Metals defaults to using Bloop as the build server. Do not change this setting, as Bloop provides the fastest compilation and best integration for local development. Open the Command Palette (Cmd+Shift+P or Ctrl+Shift+P), run `Metals: Run doctor`, and verify the status dashboard. Ensure it shows: `Build definition is coming from sbt` and `Build server currently being used is Bloop`.
If you encounter compilation errors or the IDE fails to recognize symbols, follow these steps to perform a clean import:
1. *Stop Bloop Server*: Run the following command in your terminal to stop the bloop server: `pkill -f "bloop.BloopServer"`. If you have installed bloop CLI you can run `bloop exit` instead.
2. *Clean Workspace*: Run the following command in your terminal to remove cached build metadata: `rm -rf .bloop/ .metals/ .bsp/`.
3. *Reload Window*: Run `Developer: Reload Window` from the Command Palette, and select sbt when the prompt reappears.
4. *Import Build*: Run `Metals: Import build` and wait for the process to complete.
5. *Connect to Server*: Run `Metals: Connect to build server` and wait for the process to complete.
6. *Confirm*: Run `Metals: Run doctor` and verify the status dashboard.
Eclipse
Eclipse can be used to develop and test Spark. The following configuration is known to work:
- Eclipse Juno
- Scala IDE 4.0
- Scala Test
The easiest way is to download the Scala IDE bundle from the Scala IDE download page. It comes
pre-installed with ScalaTest. Alternatively, use the Scala IDE update site or Eclipse Marketplace.
SBT can create Eclipse `.project` and `.classpath` files. To create these files for each Spark sub
project, use this command:
```
sbt/sbt eclipse
```
To import a specific project, e.g. spark-core, select `File | Import | Existing Projects` into
Workspace. Do not select "Copy projects into workspace".
If you want to develop on Scala 2.10 you need to configure a Scala installation for the
exact Scala version that’s used to compile Spark.
Since Scala IDE bundles the latest versions (2.10.5 and 2.11.8 at this point), you need to add one
in `Eclipse Preferences -> Scala -> Installations` by pointing to the `lib/` directory of your
Scala 2.10.5 distribution. Once this is done, select all Spark projects and right-click,
choose `Scala -> Set Scala Installation` and point to the 2.10.5 installation.
This should clear all errors about invalid cross-compiled libraries. A clean build should succeed now.
ScalaTest can execute unit tests by right clicking a source file and selecting `Run As | Scala Test`.
If Java memory errors occur, it might be necessary to increase the settings in `eclipse.ini`
in the Eclipse install directory. Increase the following setting as needed:
```
--launcher.XXMaxPermSize
256M
```
IDE with sbt
When you use IDEs like VSCode or Cursor and you build from terminal with `sbt`,
a common issue you'll encounter is something like
```
java.lang.RuntimeException: Failed to find name hashes for
```
This is because multiple instances are trying to build the project simultaneously. Normally
the culprit is your Java/Scala plugin in your IDEs.
In order to fix this, first you need to disable auto-build of your plugins. Then you need to
clear all the artifacts with `sbt clean`. You'll also need to clear cache in
```
~/.m2
~/.ivy2/
```
Nightly builds
Spark publishes SNAPSHOT releases of its Maven artifacts for both master and maintenance
branches on a nightly basis. To link to a SNAPSHOT you need to add the ASF snapshot
repository to your build. Note that SNAPSHOT artifacts are ephemeral and may change or
be removed. To use these you must add the ASF snapshot repository at
https://repository.apache.org/snapshots/.
```
groupId: org.apache.spark
artifactId: spark-core_2.12
version: 3.0.0-SNAPSHOT
```
Profiling Spark applications using YourKit
Here are instructions on profiling Spark applications using YourKit Java Profiler.
On Spark EC2 images
- After logging into the master node, download the YourKit Java Profiler for Linux from the
YourKit downloads page.
This file is pretty big (~100 MB) and YourKit downloads site is somewhat slow, so you may
consider mirroring this file or including it on a custom AMI.
- Unzip this file somewhere (in `/root` in our case): `unzip YourKit-JavaProfiler-2017.02-b66.zip`
- Copy the expanded YourKit files to each node using copy-dir: `~/spark-ec2/copy-dir /root/YourKit-JavaProfiler-2017.02`
- Configure the Spark JVMs to use the YourKit profiling agent by editing `~/spark/conf/spark-env.sh`
and adding the lines
```
SPARK_DAEMON_JAVA_OPTS+=" -agentpath:/root/YourKit-JavaProfiler-2017.02/bin/linux-x86-64/libyjpagent.so=sampling"
export SPARK_DAEMON_JAVA_OPTS
SPARK_EXECUTOR_OPTS+=" -agentpath:/root/YourKit-JavaProfiler-2017.02/bin/linux-x86-64/libyjpagent.so=sampling"
export SPARK_EXECUTOR_OPTS
```
- Copy the updated configuration to each node: `~/spark-ec2/copy-dir ~/spark/conf/spark-env.sh`
- Restart your Spark cluster: `~/spark/bin/stop-all.sh` and `~/spark/bin/start-all.sh`
- By default, the YourKit profiler agents use ports `10001-10010`. To connect the YourKit desktop
application to the remote profiler agents, you'll have to open these ports in the cluster's EC2
security groups. To do this, sign into the AWS Management Console. Go to the EC2 section and
select `Security Groups` from the `Network & Security` section on the left side of the page.
Find the security groups corresponding to your cluster; if you launched a cluster named `test_cluster`,
then you will want to modify the settings for the `test_cluster-slaves` and `test_cluster-master`
security groups. For each group, select it from the list, click the `Inbound` tab, and create a
new `Custom TCP Rule` opening the port range `10001-10010`. Finally, click `Apply Rule Changes`.
Make sure to do this for both security groups.
Note: by default, `spark-ec2` re-uses security groups: if you stop this cluster and launch another
cluster with the same name, your security group settings will be re-used.
- Launch the YourKit profiler on your desktop.
- Select "Connect to remote application..." from the welcome screen and enter the the address of your Spark master or worker machine, e.g. `ec2--.compute-1.amazonaws.com`
- YourKit should now be connected to the remote profiling agent. It may take a few moments for profiling information to appear.
Please see the full YourKit documentation for the full list of profiler agent
startup options.
In Spark unit tests
When running Spark tests through SBT, add `javaOptions in Test += "-agentpath:/path/to/yjp"`
to `SparkBuild.scala` to launch the tests with the YourKit profiler agent enabled.
The platform-specific paths to the profiler agents are listed in the
YourKit documentation.
Generative tooling usage
In general, the ASF allows contributions co-authored using generative AI tools. However, there are several considerations when you submit a patch containing generated content.
Foremost, you are required to disclose usage of such tool. Furthermore, you are responsible for ensuring that the terms and conditions of the tool in question are
compatible with usage in an Open Source project and inclusion of the generated content doesn't pose a risk of copyright violation.
Please refer to The ASF Generative Tooling Guidance for details and developments.